Release process
Red’s release process involves a bit of work. This document attempts to collect, in one place, all the steps needed to make a release of Red.
Types of releases
Breaking release (
3.x+1.0)Release with breaking changes, done from
V3/develop.Standard release (
3.x.y+1)Release without breaking changes that may contain both features and bugfixes.
This is done from
V3/developor3.xbranch if a breaking release is currently in development.Maintenance release (
3.x.y+1)Release without breaking changes that only contains cherry-picked enhancements and bugfixes.
Quite similar to a standard release but it is done from a short-lived release branch using the tag of a previous version as a base.
Hotfix release (
3.x.y+1)Release that is meant to quickly patch one of the currently supported releases (usually it is just the latest).
This is done from a short-lived release branch using the tag of a previous version as a base, or from
V3/develop/3.xif it doesn’t contain any meaningful code changes yet.
Making a release
As much as possible, the release steps are automated and guided by the Release Helper script,
which is shipped with the repository at tools/release_helper.py.
To use the script, you will need to install the GitHub CLI
and authenticate with your GitHub account using the gh auth login command.
The script can be started simply by running:
.venv/bin/python tools/release_helper.py
which will ask you about the release type you want to make and then guide you through the process.
Ensure there are no release blockers.
Note
These will be listed to you by the Release Helper.
You can generally skip this. Might still be worth checking in case there is some blocker related to release workflow that could potentially affect you.
Look at the milestone for the next release and check if there are any Release Blockers (labelled as “Release Blocker” on the issue tracker) that need to be handled before the release.
Check state of all open pull requests for this milestone.
Note
These will be listed to you by the Release Helper.
This is a hotfix release, you should focus on getting the critical fix out, the other PRs should not be important. However, you should still update the milestone to make your and others’ job easier later.
Decide which should be kept for the release, cooperate with another org member(s) on this. Move any pull requests not targeted for release to a new milestone with name of the release that should come after current one.
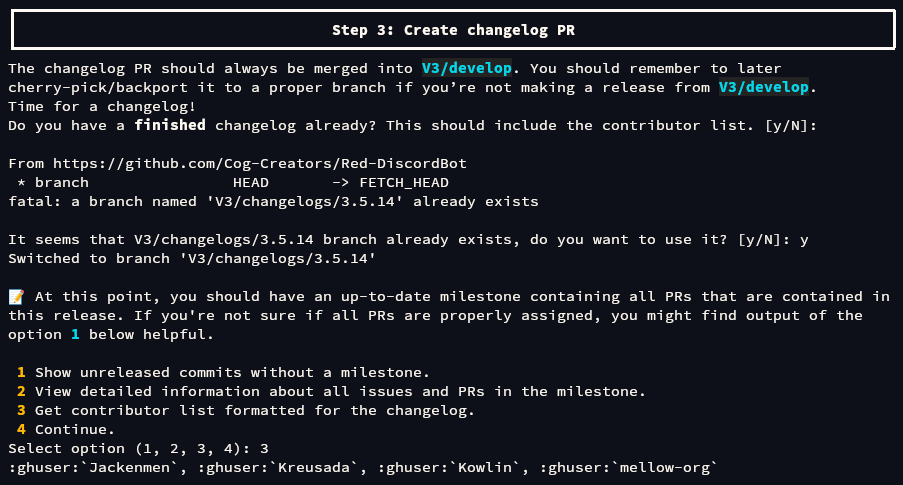
Review changelog PR.
Note
At this point, you should have an up-to-date milestone containing all PRs that are contained in this release. If you’re not sure if all PRs are properly assigned, you might find Release Helper’s
unreleasedcommand (or its “Show unreleased commits without a milestone” counter-part from the guided flow) helpful: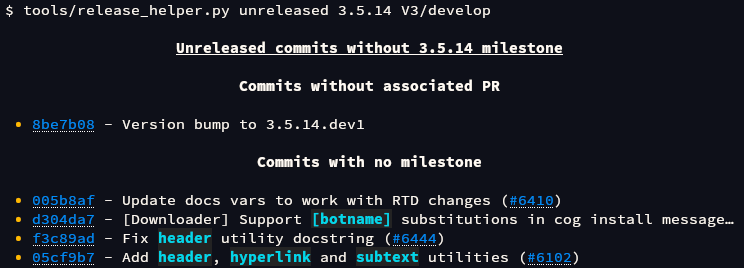
The changelog PR should always be merged into
V3/develop. You should remember to later cherry-pick/backport it to a proper branch if you’re not making a release fromV3/develop.Hotfix releases need to contain a changelog.
It can be limited to a short description of what the hotfix release fixes, for example see: Red 3.4.12 changelog
Add (or ask PR author to add) any missing entries based on the release’s milestone.
You might find the Release Helper’s
milestonecommand helpful here: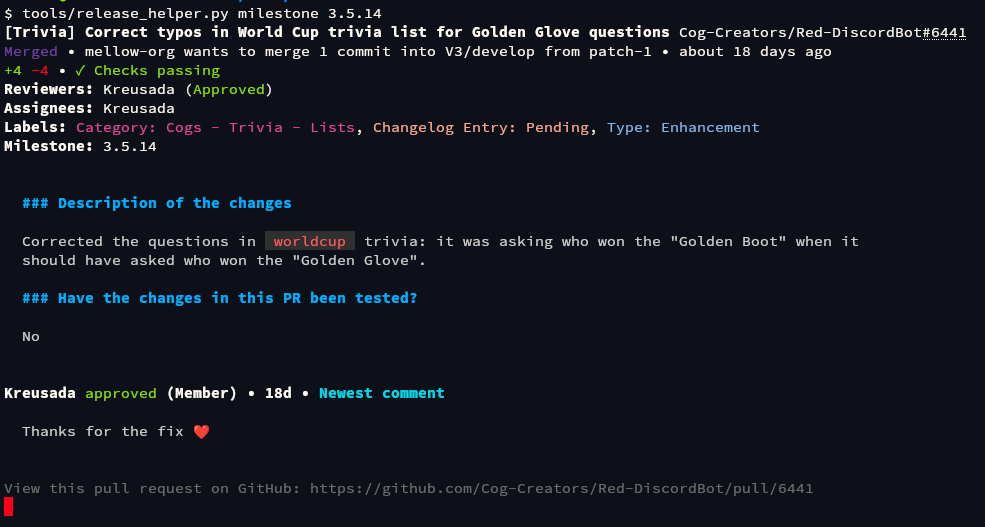
Update the contributors list in the changelog using contributors list for the milestone that you can generate using Release Helper’s
contributorscommand (or its “Get contributor list formatted for the changelog” counter-part from the guided flow):
Merge the PR once it’s ready.
Run “Prepare Release” workflow.
Note
This can be triggered automatically with the Release Helper. The below steps are an alternative way that doesn’t require the use of that tool.
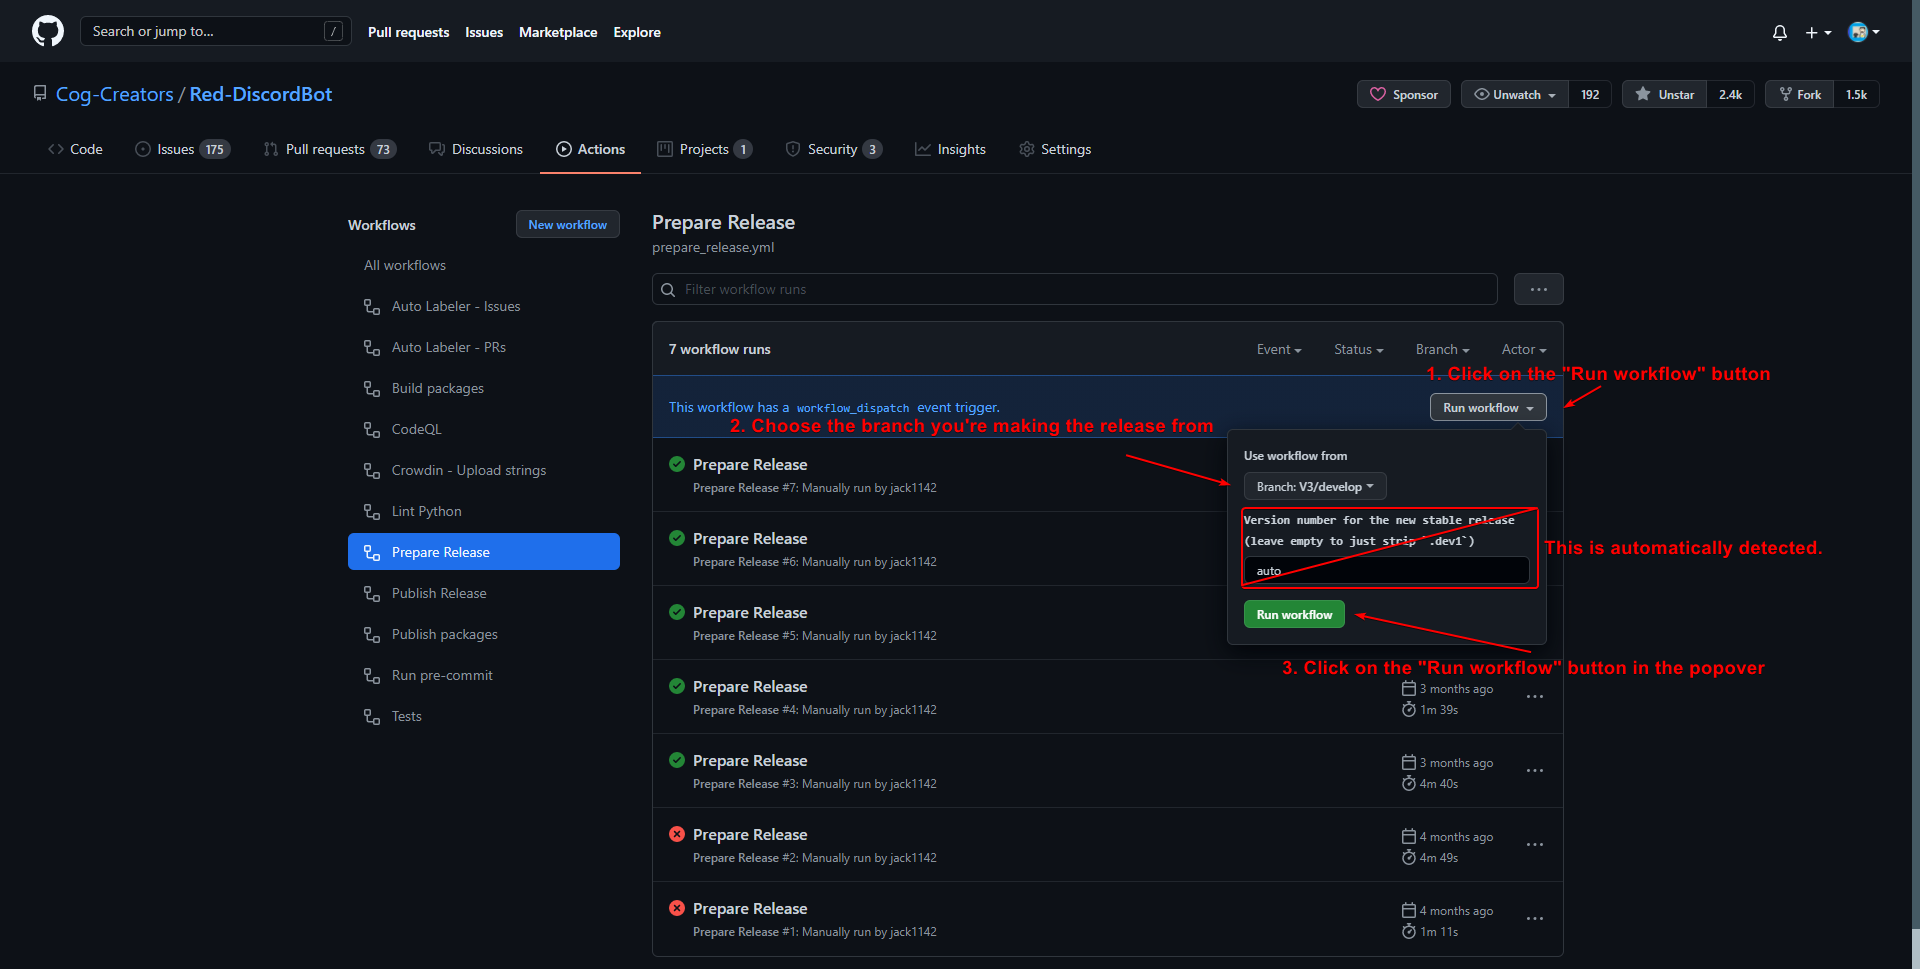
Go to https://github.com/Cog-Creators/Red-DiscordBot/actions/workflows/prepare_release.yml
Tip
This step only takes care of automatically creating some PRs, it won’t release anything, don’t worry!
Click on the “Run workflow” button
Choose the long-lived branch for the version you’re releasing
This is either
V3/developor3.xbranch that you will be cherry-picking changes from, not the short-lived release branch.Click on the “Run workflow” button in the popover
Merge the automatically created PRs.
Note
These will be listed to you by the Release Helper.
Wait for “Prepare Release” workflow to finish and merge the PRs that it created.
Create a short-lived release branch.
Note
This is a manual step - the Release Helper will pause at this step for you to perform the necessary actions.
Note
This does not apply if you’re releasing from the long-lived branch (i.e.
V3/developor3.x).Create a branch named
V3/release/VERSION_TO_RELEASE_HEREbased off a tag of previous version.This can be done with the command:
git checkout -b V3/release/VERSION_TO_RELEASE_HERE PREVIOUS_VERSIONCherry-pick the critical fix, the changelog, the automated PRs, and the version bump.
Push the branch to upstream repository (Cog-Creators/Red-DiscordBot)
With a typical setup where
upstreamremote points to upstream repository andoriginpoints to user’s fork, this can be done with the command:git push -u upstream V3/release/VERSION_TO_RELEASE_HERE
Create a branch named
V3/release/VERSION_TO_RELEASE_HEREbased off a tag of previous version.This can be done with the command:
git checkout -b V3/release/VERSION_TO_RELEASE_HERE PREVIOUS_VERSIONCherry-pick the relevant changes, the changelog, the automated PRs, and the version bump.
Push the branch to upstream repository (Cog-Creators/Red-DiscordBot)
With a typical setup where
upstreamremote points to upstream repository andoriginpoints to user’s fork, this can be done with the command:git push -u upstream V3/release/VERSION_TO_RELEASE_HERE
This does not apply.
Write (not send!) an announcement for the new release.
Note
This and the following steps are not performed by the Release Helper.
This is the announcement that you will later post to Discord.
Remember to:
Mention that the changelog contains “Read before updating” section (if applicable):
__**Before you update**: please ensure that you read the “Read before updating” section in the changelogs first.__Include the link to changelog.
Note
Use link to
stableor tagged (i.e.3.4.0) version of docs, DO NOT USE link tolatest.The changelog link should point to the section for the specific release (the part after
#in the URL)
For example:
Full changelogs here: <https://docs.discord.red/en/stable/changelog_3_4_0.html#redbot-3-4-12-2021-06-17>
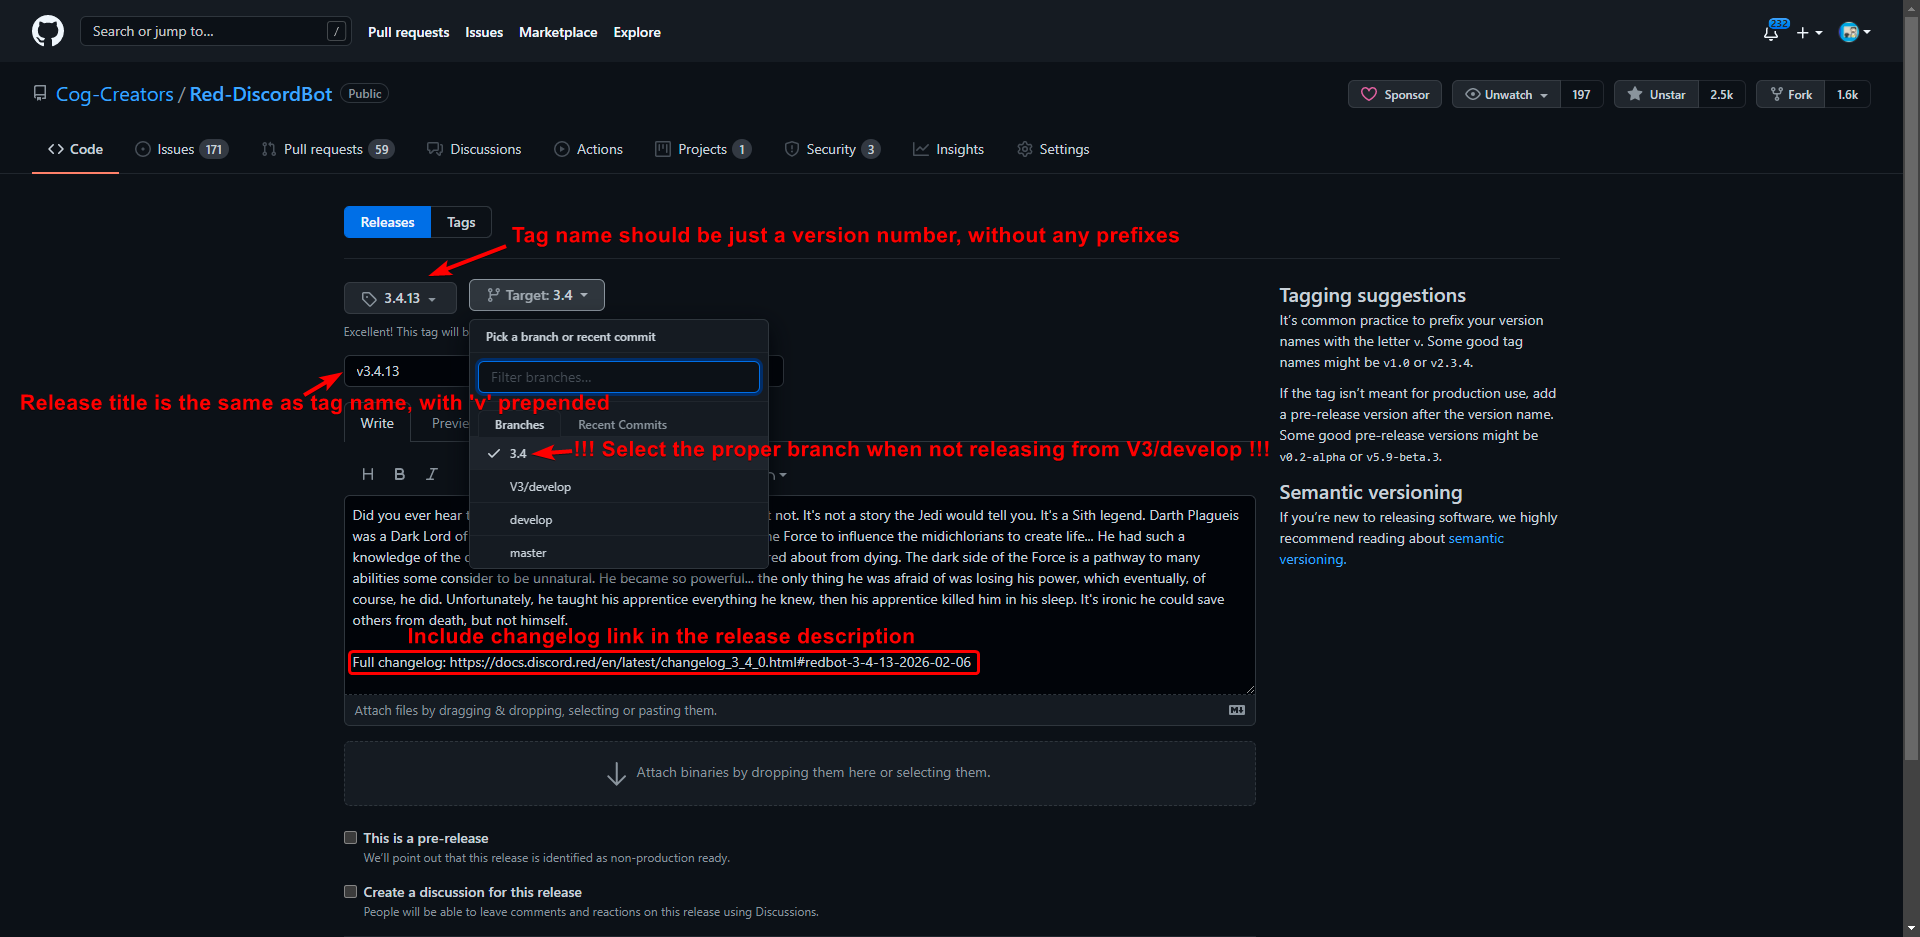
Make a new release through GitHub Releases.
Attention
Remember to change the target branch when you’re not releasing from
V3/develop!Put the version number as tag name (i.e.
3.4.0)Put the version number prepended with “v” as release title (i.e.
v3.4.0)Ensure that the target branch is selected correctly
Write a short release description
The description can be informal, the changelog has all the important information already. Be sure to put a link to full changelog from our docs in release description.
The changelog link should point to the section for the specific release (the part after
#in the URL), e.g.:Full changelog: https://docs.discord.red/en/latest/changelog_3_4_0.html#redbot-3-4-12-2021-06-17
Check the correctness of Release information and approve or reject the environment run.
Danger
This is the step when the new version will get published.
At this point you should already have written the announcement that you will be sending after this is done.
Go to https://github.com/Cog-Creators/Red-DiscordBot/actions/workflows/publish_release.yml
Click on the first workflow run (with a clock icon) on the list.

Click on the “GO HERE BEFORE APPROVING” job.
Expand the “REVIEW OUTPUT OF THIS STEP BEFORE APPROVING” step.
Verify the release information printed in the step is correct.
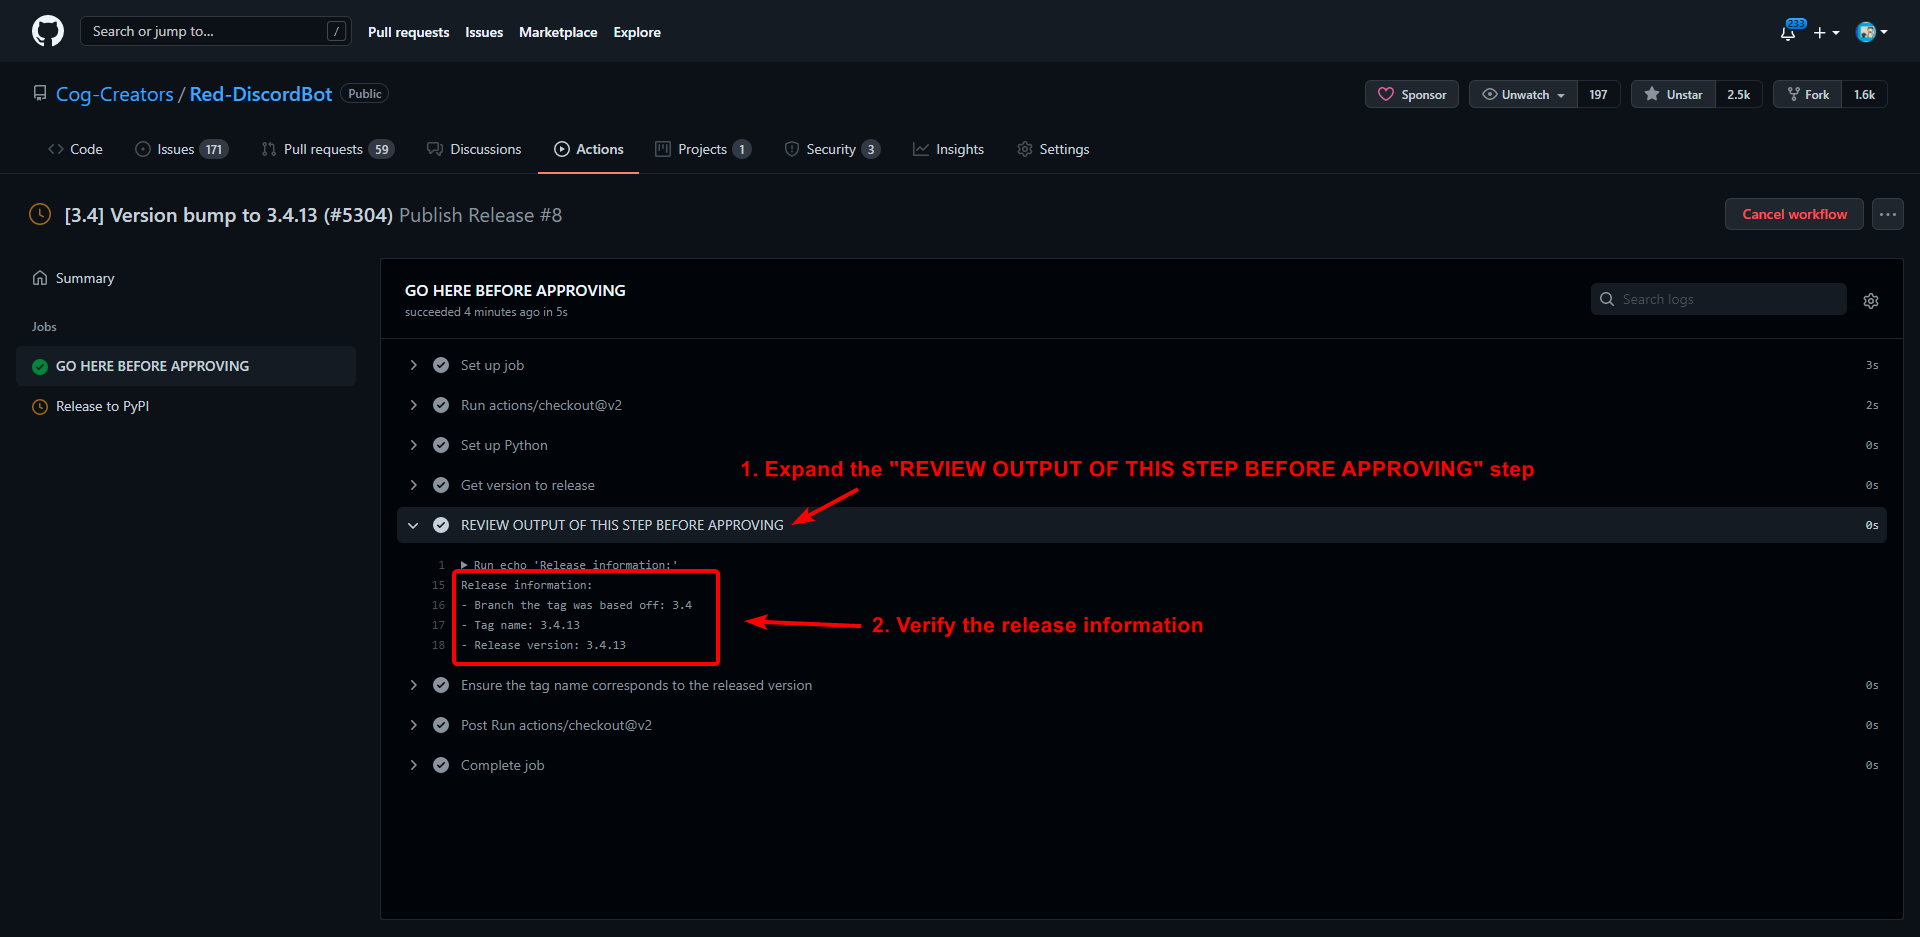
Go back to Summary, click on “Review deployments” and approve or reject the environment run.
Wait for the CI to finish its job.
“Publish Release” workflow needs to finish before you can continue. You should also wait for the
stablebuild on the Read The Docs to finish if it hasn’t already.Send and publish an announcement in Discord.
This is the announcement that you wrote in the earlier step.
Merge the PR bumping to dev version.
It should have been automatically created during “Publish release” workflow that you approved earlier.
Close release milestone and create a new one.
Close the milestone for the release that was just made and create an appropriately named milestone for the next release.


After all this is done, you can enjoy the new release (or make a hotfix if there’s a critical issue, let’s hope there’s not though :))